How to create Dev Protocol Dapp (2/3)
はじめに permalink
みなさん、こんにちわ
Dev Protocolで用意されているライブラリを使って、3回に分けて簡単なDappを作成したいと思います。
今回は2回目の記事になります。前回をまだ見ていない場合は1回目に戻って進めてみてください。
今回はクリエイターの詳細画面を作っていきたいと思います
- STEP01: クリエイター情報の取得
- STEP02: トークン情報の取得
- STEP03: トークンのカバー画像の取得
- STEP04: 詳細ページをコーディングする
開発環境の用意 permalink
開発環境は1回目で使用したものを引き続き使っていきます。詳しくは1回目をご確認ください
今回作成するページについて permalink
今回作成するページは、前回作成したクリエイター一覧ページから遷移される、クリエイターの詳細ページになります。クリエイターの詳細ページでは、クリエイターの情報と所持しているトークンの表示を行います。
STEP01: クリエイター情報の取得 permalink
クリエイター情報は、dev-for-appsより取得します(前回と方法は同じです)取得するために使うクリエイターのアドレスは、indexページからのリンクURLに付加されています
/**
 * indexから以下のURLでページ遷移されてくる
 * https://localhost:3000/tokens.html?creator=xxxxx
 **/
const urlParams = new URLSearchParams(window.location.search);
const creator   = urlParams.get('creator')

const query_params = new URLSearchParams({
    address: creator,
});

const response = await fetch("https://dev-for-apps.azureedge.net/accounts?" + query_params, {
    method: "GET"
});

...
STEP02: トークン情報の取得 permalink
トークン情報は、Data Viewerから取得します。前回と同じ方法ですが、クリエイターのアドレスでフィルタリングして取得します。前回と取得したい情報が違うのでクエリも変更しています
const response = await fetch("https://api.devprotocol.xyz/v1/graphql", {
        method: "POST",
        headers: {
            "X-Requested-With": "xhr",
            "Content-Type": "application/json",
        },
        body: JSON.stringify({
            query: `
                query Properties {
                    property_meta(where: {author: {_eq: "${address}"}}) {
                        property
                        author
                        name
                    }
                }
            `,
        }),
    });
STEP03: トークンのカバー画像の取得 permalink
Data Viewerでは、トークンのカバー画像は取得できないためdev-for-appから取得します。前回のクリエイター情報の取得の時とはエンドポイントが変わります
const query_params = new URLSearchParams({
    address: address,
});

const response = await fetch("https://dev-for-apps.azureedge.net/properties?" + query_params, {
    method: "GET"
});
習得したデータは以下のようなJSON形式になっています。
[
    {
        "cover_image": {
            "url": "https://storageaccountdevfobc15.blob.core.windows.net/dev-for-apps-images/assets/d3e6c900_6a1b_11ea_91be_d87dfda8b8e7_36d483d5b7.jpg",
            ...
        },
        ...
    }
]
これ以外にもさまざまな情報が取得できますが、ここでは詳細ページで使用するもの以外は省略しております。
STEP04: 詳細ページをコーディングする permalink
それでは詳細ページをコーディングしていきましょう。以下のコードを参考にmain.tsをコーディングしてください
window.addEventListener("load", async () => {
  /**
   * main.tsは、一覧ページと詳細ページの両方から呼ばれるので
   * それぞれで処理を分けるため処理を追加する
   */

  // 注意)1回目で作成した一覧ページの処理はこのif文の中に移動する
  if (document.getElementById("page-index")) {

  }

  // 詳細ページの処理はここから記載する
  if (document.getElementById("page-tokens")) {
    // URLのGETパラメーターからクリエイターのアドレスを取得する
    const urlParams = new URLSearchParams(window.location.search);
    const creatorAddress = urlParams.get('creator');

    // dev-for-appを使用してクリエイター情報を取得する
    const creatorInfo = await getCreatorInfo(creatorAddress);

    // クリエイター情報を表示するHTMLの作成
    const profileElementString = `
        <img class="mb-4 rounded-circle border border-3 border-dark" src="${creatorInfo.portrait.url}" alt="creator image" width="168" height="168" style="object-fit: contain">
        <p class="mb-0 fs-5">${creatorInfo.name}</p>
    `

    const creatorHTMLElement = document.getElementById("creator");
    creatorHTMLElement.innerHTML = profileElementString;

    // トークン情報を表示させるHTMLを取得する
    const tokensHTMLElement = document.getElementById("tokens");

    // Data Viewerからトークン一覧を取得してくる
    for (const token of await getTokens(creatorAddress)) {
      // トークンの画像を取得します
      const tokenInfo = await getPropertiesInfo(token.property)

      if (!tokenInfo) {
        continue
      }

      const image = tokenInfo.cover_image ? tokenInfo.cover_image.url : ""

      // トークン情報を表示するHTMLの作成
      const div = document.createElement('div');

      div.innerHTML = `
            <article class="mt-4 mb-3 d-flex">
                <img class="me-3" src="${image}" alt="token image" width="128" height="96" style="object-fit: contain">
                <div class="d-flex flex-column justify-content-between">
                   <p class="fs-6">${token.name}</p>
                   <div class="d-flex">
                        <button type="button" class="me-3 btn btn-lg btn-primary" address="${token.property}" amount="1">1 DEV</button>
                        <button type="button" class="me-3 btn btn-lg btn-success" address="${token.property}" amount="5">5 DEV</button>
                        <button type="button" class="btn btn-lg btn-danger" address="${token.property}" amount="10">10 DEV</button>
                   </div>
                </div>
            </article>
        `;

      const tokenHTMLElement = div.firstElementChild;

      // 追加します
      tokensHTMLElement.appendChild(tokenHTMLElement)
    }
  }
});
ここからのコードは上記のコードの下に追記するか、別ファイルを用意してImportする形でもよいです
async function getPropertiesInfo(address) {
    const query_params = new URLSearchParams({
        address: address,
    });

    const response = await fetch("https://dev-for-apps.azureedge.net/properties?" + query_params, {
        method: "GET"
    });

    const info = await response.json();

    if (!info[0]) {
        return
    }

    return info[0];
}
async function getTokens(creator) {
const response = await fetch("https://api.devprotocol.xyz/v1/graphql", {
method: "POST",
headers: {
"X-Requested-With": "xhr",
"Content-Type": "application/json",
},
body: JSON.stringify({
query: `
query Properties {
property_meta(where: {author: {_eq: "${creator}"}}) {
property
author
name
}
}
`,
}),
});
const json = await response.json();
return json.data.property_meta;
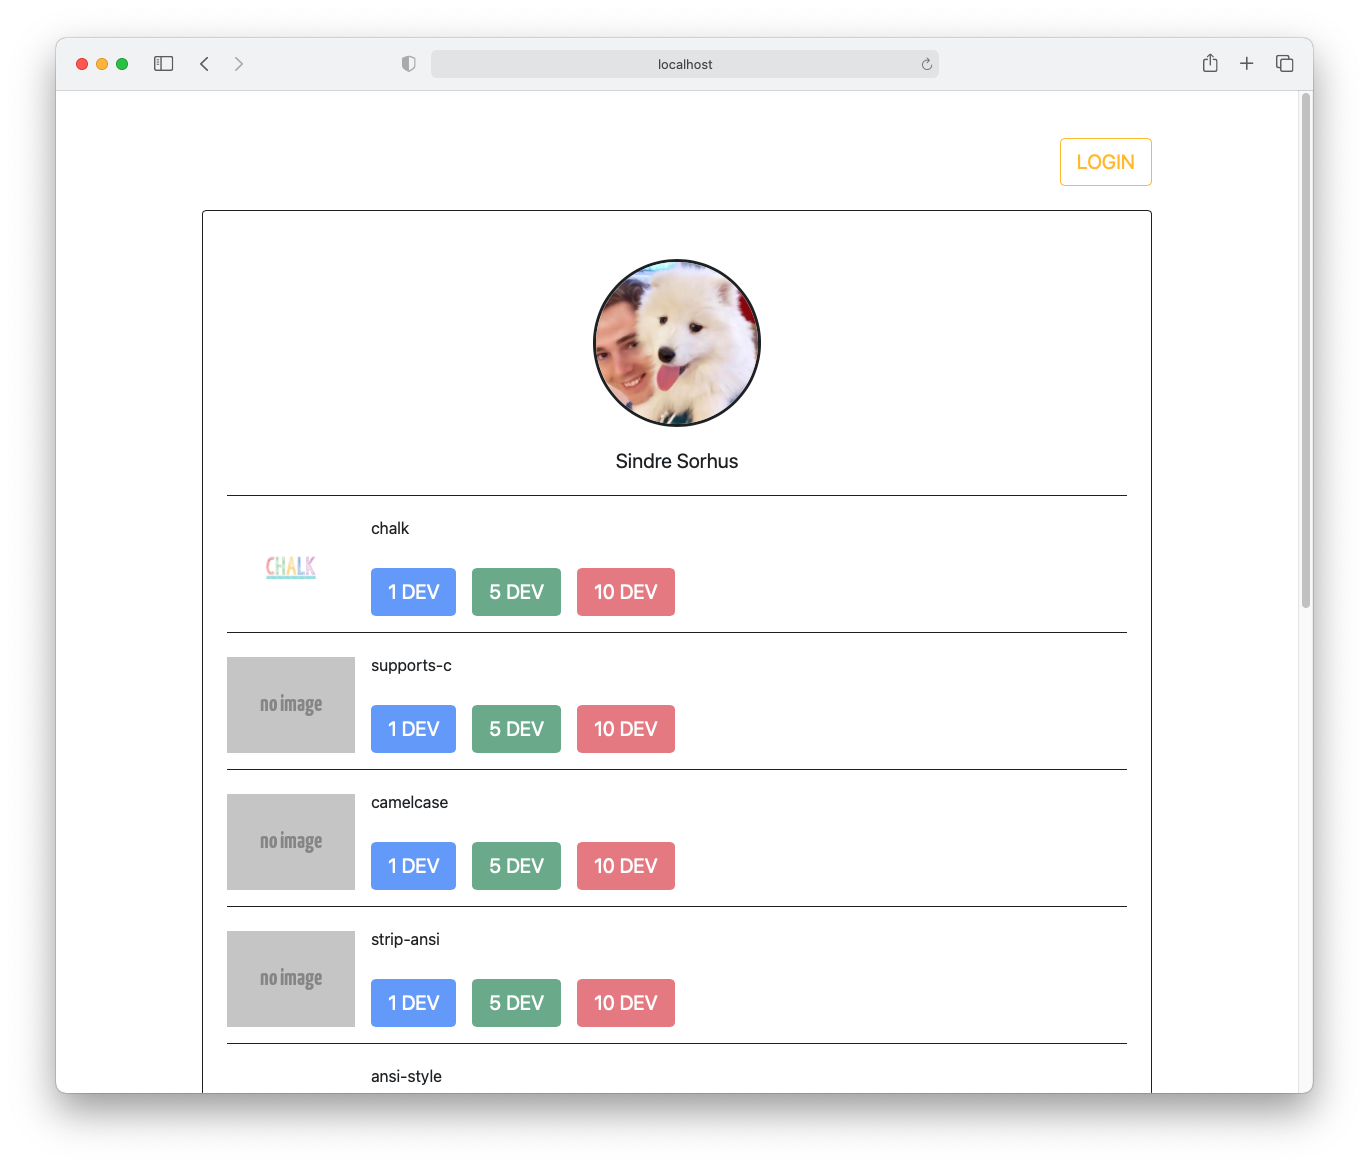
}ここまでのコーディングと、少しの修正を加えると以下のようなページが完成します
このソースコードは下記より確認することができます
https://github.com/kazu80/tokener-find/tree/master/src
まとめ permalink
今回はData Viewerからクリエイターが所持しているトークン情報を取得して、そのトークンの画像をdev-for-appから取得して詳細ページを作りました。Data Viewerとdev-for-appの使い方にも慣れてきたのではないでしょうか。
次回はトークンにステーキングする処理と、自分のWalletとの接続を作成していきたいと思います
🌈 この記事はお役に立ちましたか?
今後より良いコンテンツをお届けしていくために、ぜひご質問やフィードバックなどいただけると幸いです🌱
▶ フォーラムはこちら
- Dev Protocol は全てOSSとして公開しています。ぜひIssueやPRを送ってください📢 時にバウンティがあります。
▶ Dev ProtocolのGitHubはこちら
- Dev Protocol の改善提案(DIP)プロセスも公開されています。ぜひコメントをお待ちしています🌟
▶ DIPはこちら